
Solving the Issue of Sticky Thumbsticks: A Step-by-Step Guide for Your DualSense Controller
Solving the Issue of Sticky Thumbsticks: A Step-by-Step Guide for Your DualSense Controller
Key Takeaways
- Adjust the dead zones and stick sensitivity to mask stick drift but know it’s only a temporary fix.
- File a warranty claim with Sony if your controller is still covered to potentially get a free repair or replacement.
- Try cleaning your analog sticks with isopropyl alcohol or replace faulty sticks to fully resolve stick drift issues.
A misbehaving PS5 controller is a major annoyance that makes basic in-game movement and aiming a chore. Here are some tips you can use to resolve the issue and get back in the game.
What is Stick Drift?
Stick drift is a fairly self-explanatory term for an analog stick that moves without any explicit movement from the player. This manifests as unwanted movement within a game, whether it’s the on-screen reticle moving on its own or your character slowly drifting in a particular direction.
The problem is a result of wear to the mechanical potentiometers used in most game controllers. These mechanisms use a sliding contact to measure a change in voltage, which corresponds with a value on the X and Y axis. As these contacts become worn or dirty, stick drift can occur due to incorrect readings being registered.
Stick drift isn’t always predictable. It can appear and disappear from one moment to the next, but it invariably leads to the feeling that you can’t trust your controller. With potentiometer-based controllers, it’s usually a matter of when not if stick drift will occur.
Once stick drift starts, the problem is unlikely to go away on its own. The problem is likely to only get worse and worse until you decide to do something about it. Hall Effect joysticks use magnets which makes them far more resilient to stick drift.
Adjust Dead Zones and Sensitivity
The dead zone refers to the distance you can move a controller before movement is registered. The larger the dead zone, the more you’ll need to move the stick before seeing the result on screen. A larger dead zone can help mask stick drift by essentially ignoring small unwanted inputs.
This is a quick fix, not a long-term solution. Since stick drift is only likely to get worse over time, eventually even this “fix” won’t work. Depending on which DualSense controller you have, it may not work at all since this is a setting you may need to adjust within each game.
For standard DualSense controllers, there is no system-level dead zone control. Instead, you’ll need to launch the settings menu in whatever game it is you’re playing and look for a slider that controls the dead zone on your stick of choice. The good news is that many first-person shooters and racing games include this option. The bad news is that many games don’t, and you’ll need to set it in each game you play.
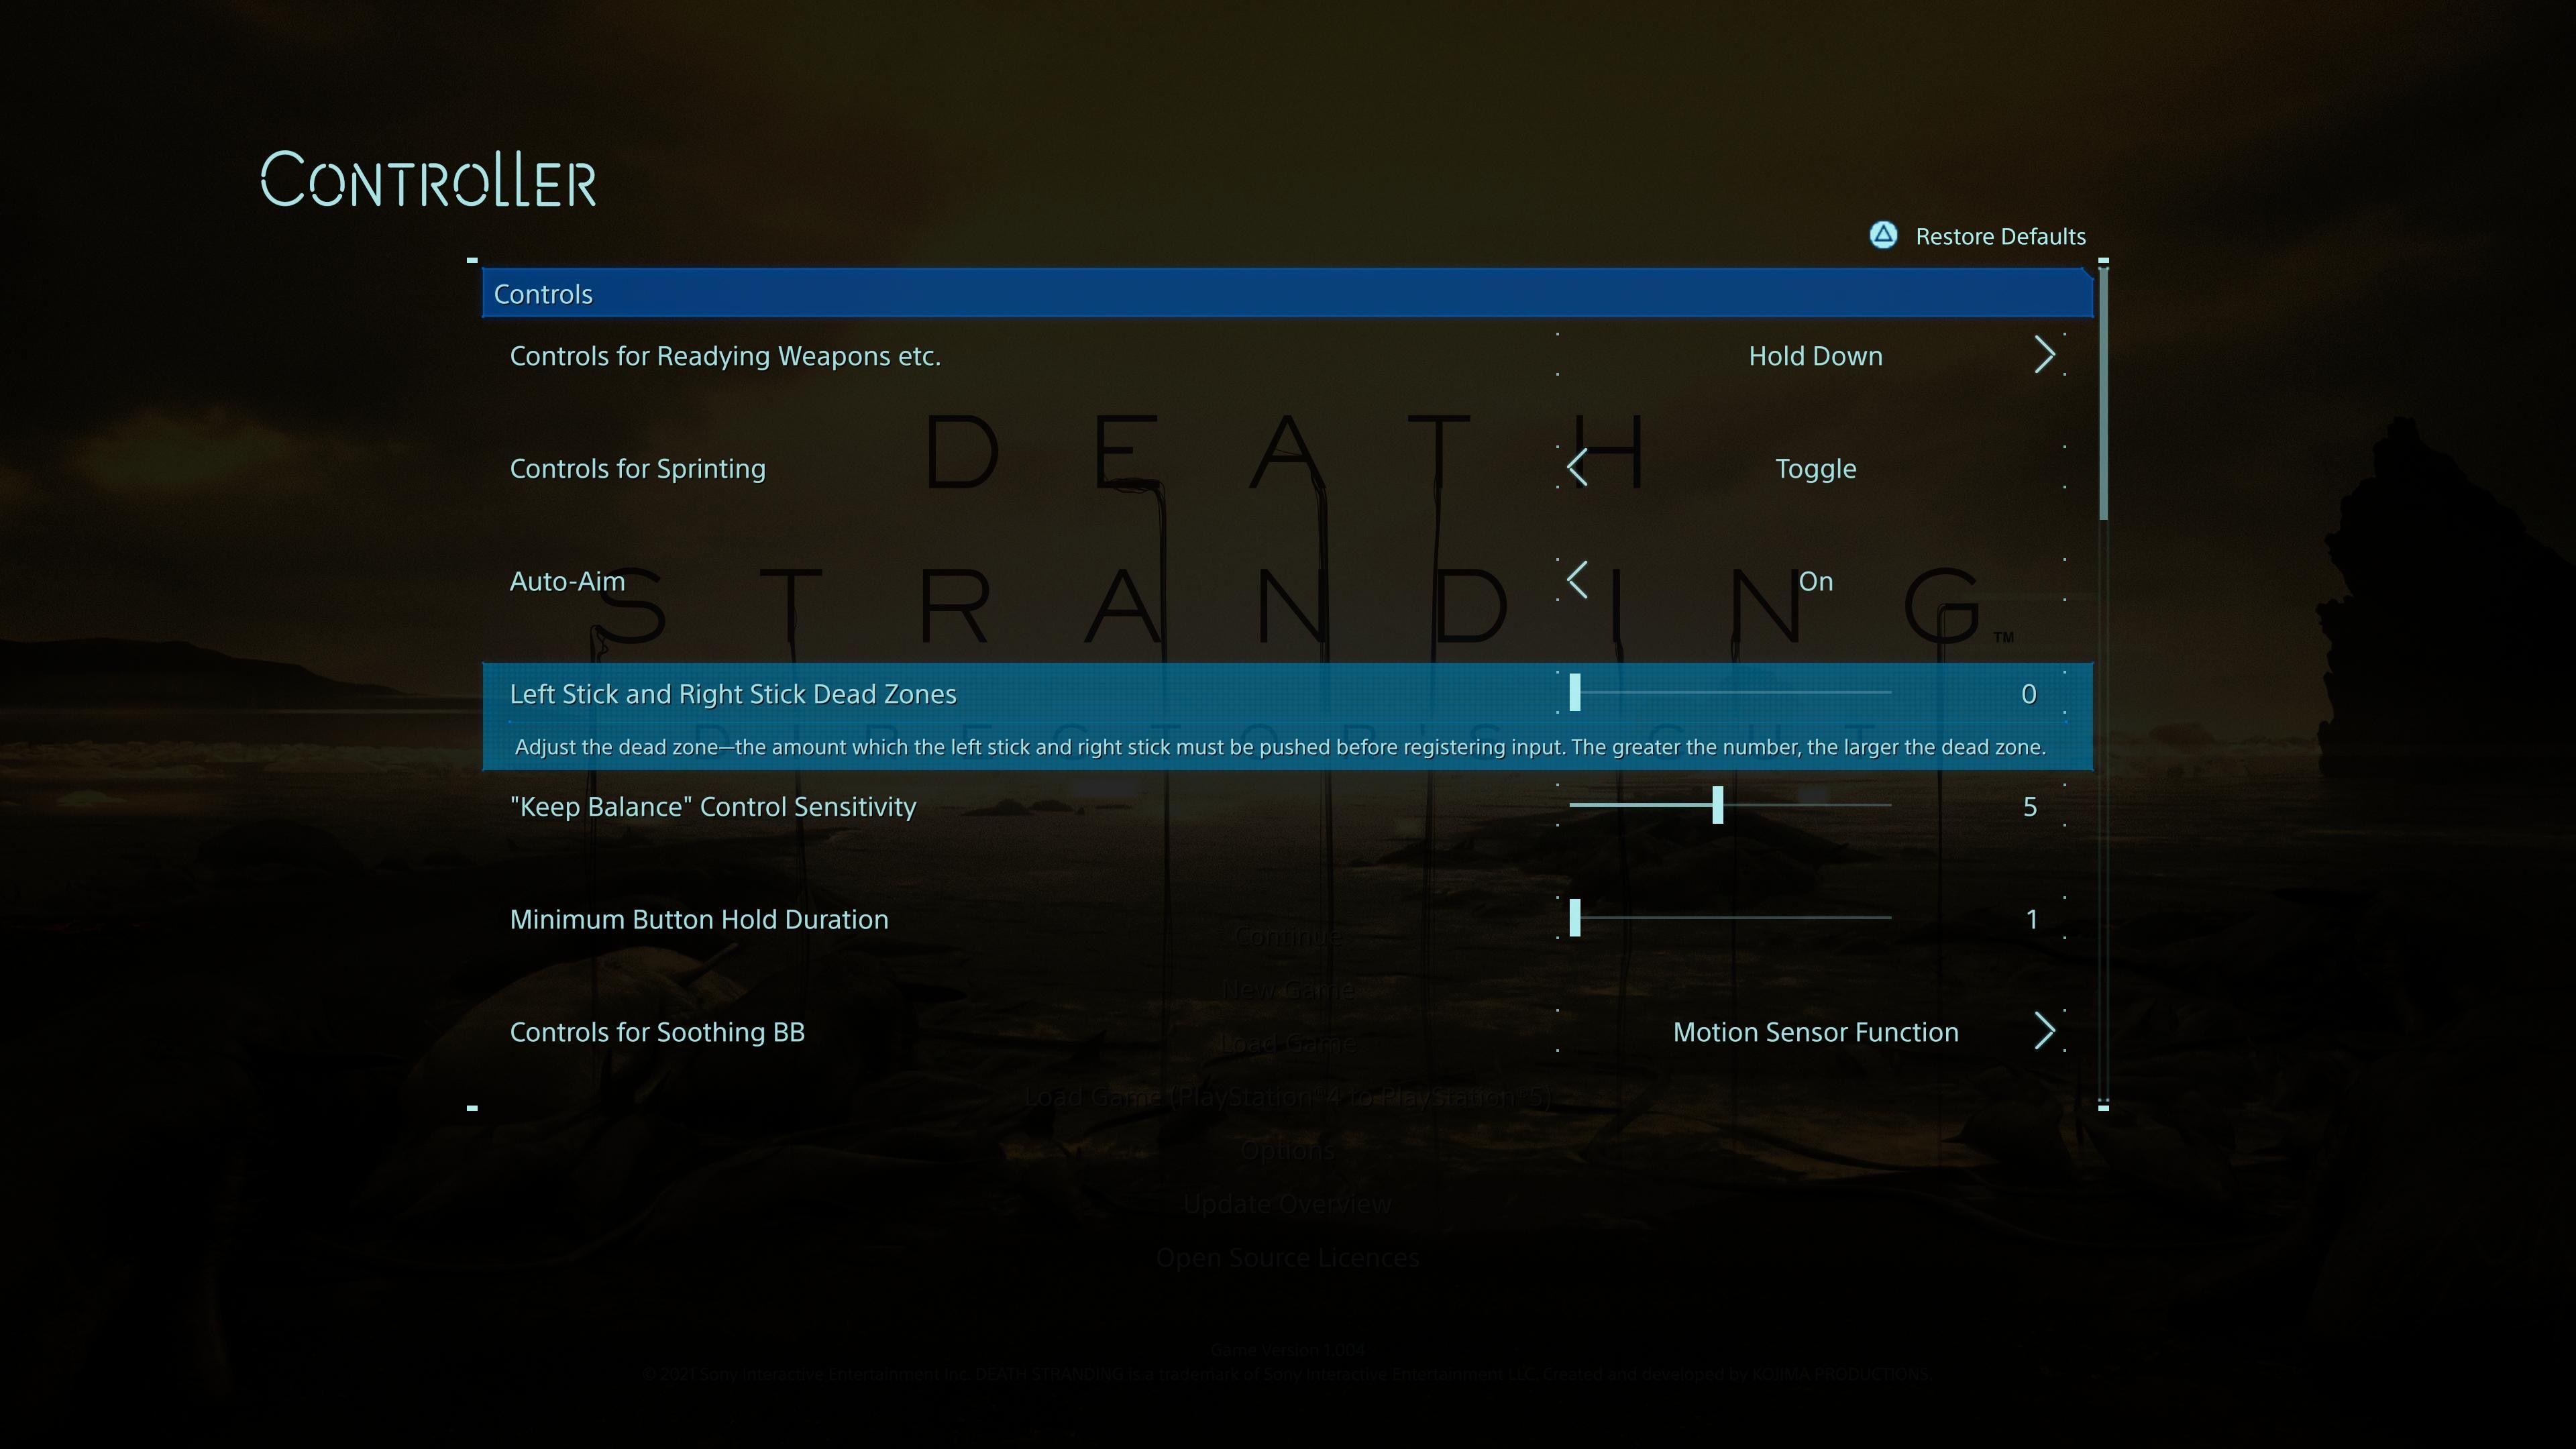
If you have a DualSense Edge controller , you’re in luck. You can adjust the dead zone settings by creating and using a custom profile. To do this, turn on your PS5 and head to Settings > Accessories > DualSense Edge Wireless Controller > Custom Profiles. Use the “Create Custom Profile” option followed by the “Stick Sensitivity/Deadzone” setting to effectively “trim” the stick drift.
Once you’ve increased the dead zone your controller will feel less precise and you may feel like you have less fine control over in-game actions. It’s probably better to have a controller that feels less precise than one that exhibits stick drift.
You may also have success by adjusting the stick sensitivity settings within whatever game it is you’re playing. This won’t eliminate drift, but it will make it less noticeable. Unfortunately, it will also make things feel more sluggish across the board.
File a Warranty Claim
If your controllers are still covered by warranty, stop reading right now and file a warranty claim with Sony or whichever retailer you purchased them from. Even though sticks are likely to drift eventually, they shouldn’t start exhibiting this problem within the warranty period (usually a year). You should get a good few years out of your controller, even with heavy use.
A successful warranty claim will see your controller repaired or replaced with a brand-new one for free. Your warranty should also reset on the replacement, so make sure you make a note of any supporting documents you receive when you get your controller (or replacement) back.
You can use the PlayStation Support website to reach out to Sony and get the ball rolling.
Clean Your Analog Sticks
If the problem is caused by dirt or appeared after you spilled something on your controller, there’s a chance that a simple clean will do the trick. For this, you’ll need some cotton balls and isopropyl (rubbing) alcohol (70% works fine).
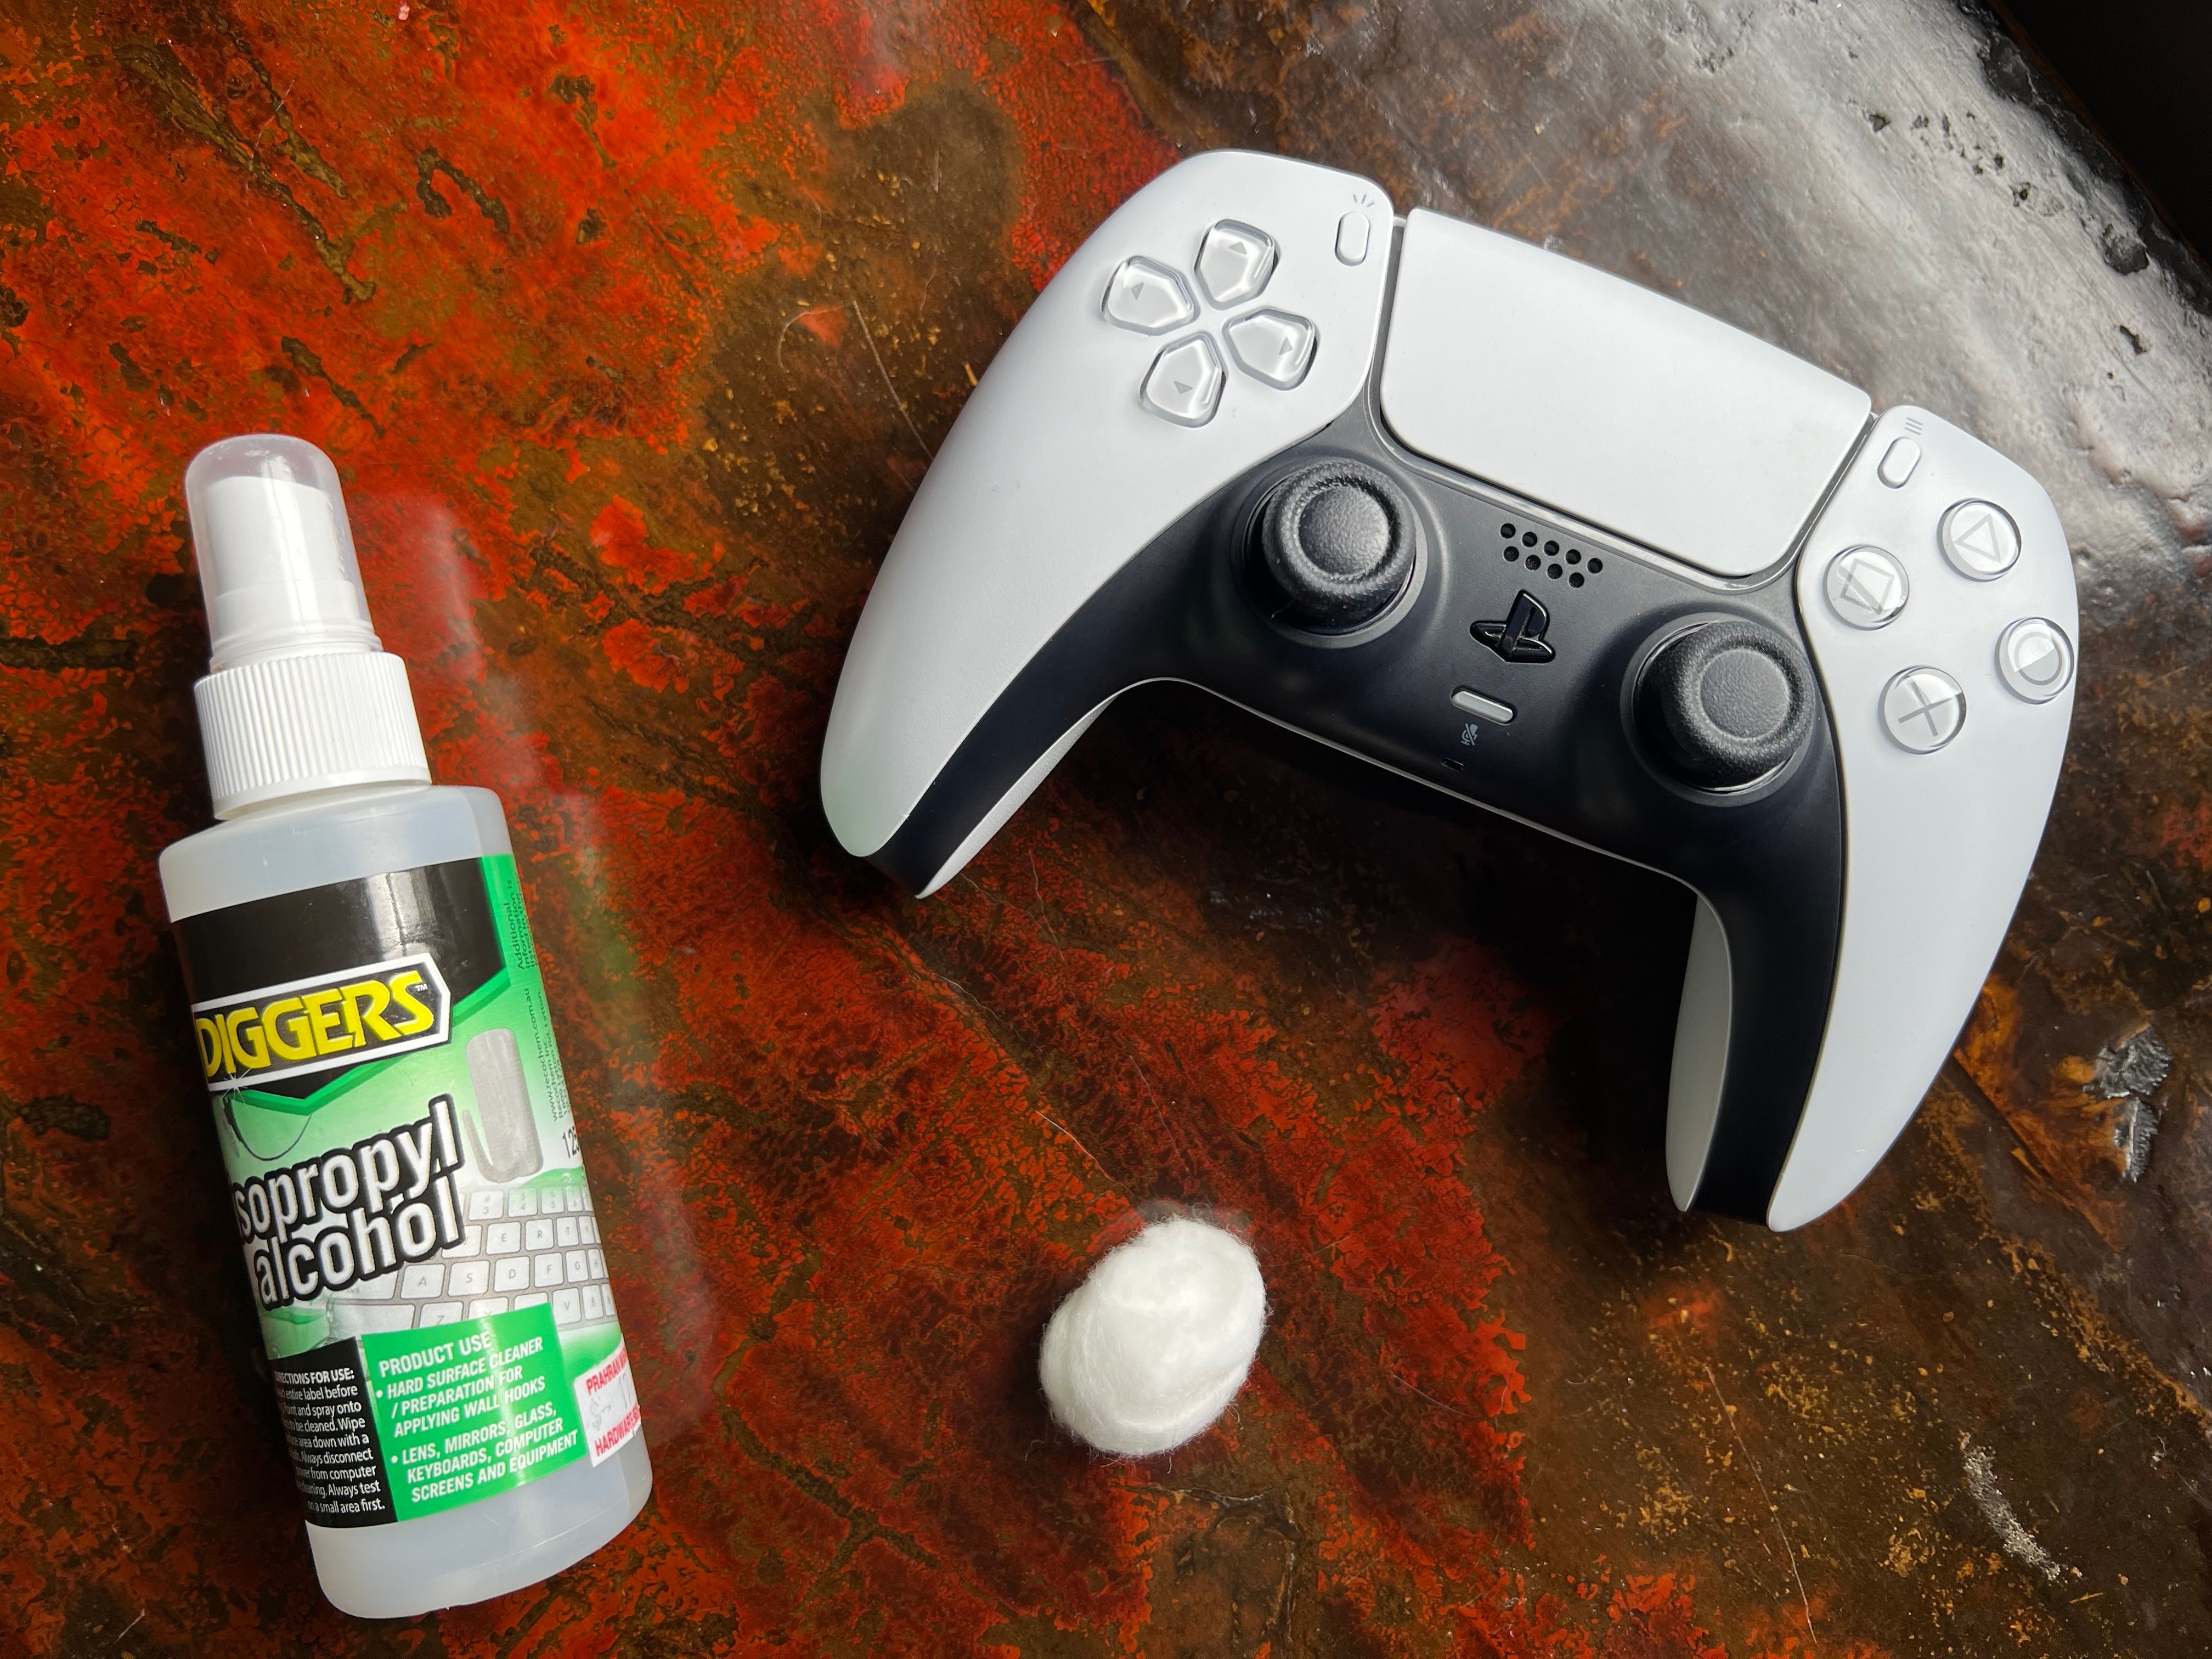
Tim Brookes / How-To Geek
Alcohol is great at loosening grime and it has the bonus of evaporating quickly. This makes it relatively safe for use on electronics and means that you don’t need to worry about “drying” the controller out afterward. That said, there are some precautions to take when going this route.
Make sure that your controller is off, just in case (press and hold the “PS” button until the light goes off). You’ll want to avoid soaking the controller in too much alcohol, mostly because you won’t need a lot to get the job done. Cotton balls help to moderate the amount of alcohol you can apply. Even if this method doesn’t work, there are still things you can do so don’t get too despondent and pour an entire bottle of iso over your controller in frustration.
The simplest method is to apply isopropyl alcohol to the cotton ball and then place it at the very edge of your analog stick’s housing while rotating in circles. You might need to keep saturating the cotton bud as the alcohol will make its way into the controller and evaporate.
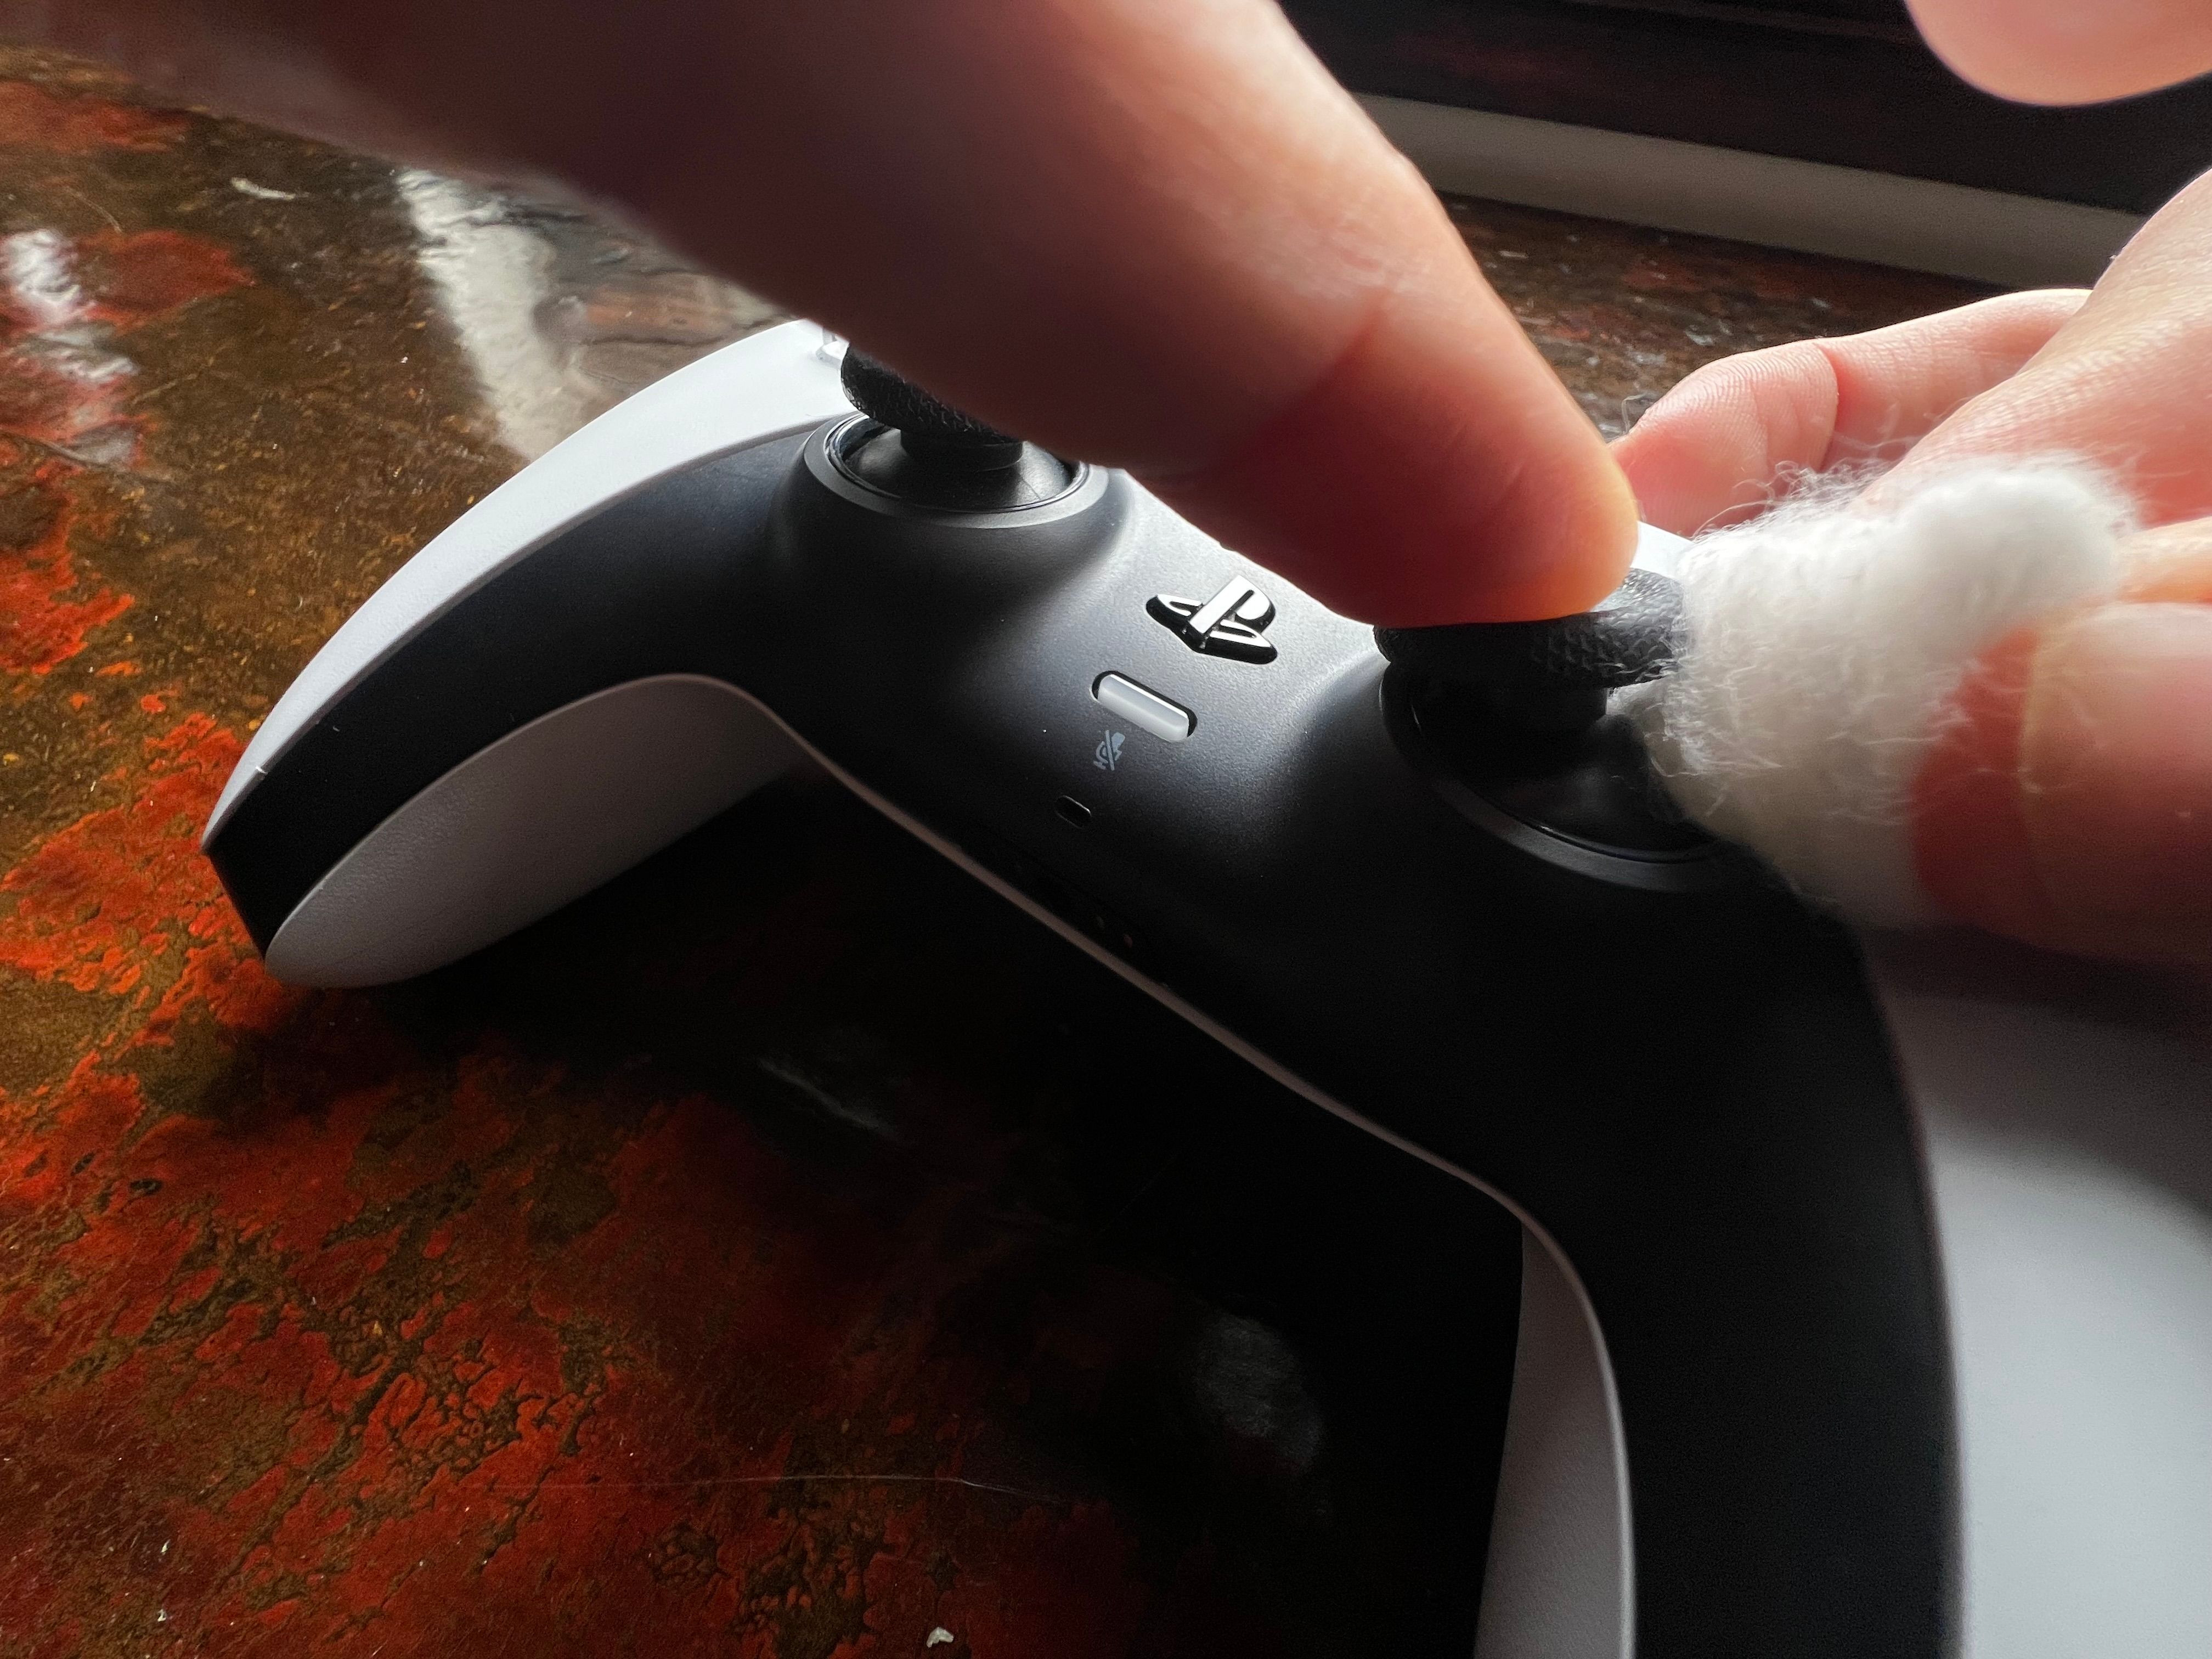
Tim Brookes / How-To Geek
Essentially, you’re working the grease and grime loose using the alcohol as a cleaning solvent. It’s worth repeating this method until you’re happy that you’ve done all you can and that more alcohol won’t necessarily help.
Replace Faulty Analog Sticks
One thing that will resolve your stick drift issue is replacing the faulty stick. Depending on which DualSense controller you have, this could take anywhere from a few minutes to over an hour.
The good news for DualSense Edge owners is that replacing the sticks is relatively easy. You can buy replacement stick modules from Sony for $19.99 each (when they’re in stock, at least). Pop the controller cover off using the “RELEASE” slider on the underside of the pad. Now it’s a matter of raising the release lever, sliding the old module out, replacing it with the new one, and pushing the release lever down again.
For standard DualSense controllers, this isn’t an option. Instead, you’ll need to purchase a replacement joystick module from a supplier like iFixit for $14.99 and then follow a joystick replacement guide to complete the repair. According to iFixit, this is “very difficult” and could take up to two hours.
This process requires careful disassembly of the entire controller, desoldering the old joystick module, soldering the new joystick module, and then reassembling everything by following the steps in reverse. Though the guide is simple enough to follow, you will need tools like a soldering iron and confidence in your ability to do this.
The silver lining is that the parts aren’t that expensive, so if the alternative is to simply recycle your old controller then you might want to give it a shot. Who knows, maybe you’re a soldering pro?
Get Someone to Fix It for You
Do you know someone with soldering skills and a penchant for fixing technology? Now might be the time to buddy up to them, and if you follow along you might be able to learn something along the way.
Alternatively, repair shops may help you out assuming the cost isn’t prohibitive. You can buy a new DualSense controller for $69.99 or less if you can find a deal. If you’re thinking about getting your controller repaired, make sure that the quote includes parts and labor.
Sadly, it’s often cheaper to just buy a new one than it is to fix the old one.
Also read:
- [New] 2024 Approved Facebook Video Extravaganza The Most Advanced Fire-Browser Tools, Updated
- [New] 2024 Approved How to Fix YouTube Shorts Thumbnail Not Showing Problem
- [New] Full Screen Recovered From OBS Errors for 2024
- [New] Step-by-Step Increasing Viewership with Facebook Mobile Broadcasts for 2024
- [Updated] In 2024, Elevating Your YT Content with the Top Thumbnail Hacks
- Audio Arsenal: Comparing the Specs of AirPods Pro & Galaxy Buds Pro
- Building a Linux Ecosystem Within Hyper-V Windows Environment
- Enjoy Smooth Gaming Experience After Fixing Star Wars Battlefront 2 Delays
- Exploring Every Feature of the Arlo Video Monitoring Package
- In-Depth Review of the Imo Instant Messaging Service for Seamless Communication
- Microsoft Faces Tech Giants as Rivals Unmask Its AI Trials in Spotlight
- Prime Day Spectacular: Unmissable Amazon Deals on iPads and Apples Laptops
- The Motorola One Hyper Reviewed: Surpassing Expectations with Its Eye-Catching Specs and Value
- The Next Generation of Gaming: A Deep Dive Into the Features, Performance & Stylish Appearance of Dell's Alienware Aurora Rnv.
- The Truth About Cyberpunk 2077: How a Potential Masterpiece Turns Unfinished
- Unleashing Aerial Adventures: The Ultimate Guide to Blade BLH4100 RTF RC Helicopter for Outdoor Enthusiasts
- Zoom to the Ends of Earth: Meet Nikon COOLPIX P1000
- Title: Solving the Issue of Sticky Thumbsticks: A Step-by-Step Guide for Your DualSense Controller
- Author: Eric
- Created at : 2024-11-20 21:52:48
- Updated at : 2024-11-24 17:20:43
- Link: https://buynow-reviews.techidaily.com/solving-the-issue-of-sticky-thumbsticks-a-step-by-step-guide-for-your-dualsense-controller/
- License: This work is licensed under CC BY-NC-SA 4.0.